Tuesday, May 19, 2020

Pork and chive dumplings


Based loosely on this recipe


But... used store bought dumpling skins.  Added less soy sauce and no salt.  Also added a bit of ginger powder, and siracha sauce

Dumpling Ingredients
Start by adding the oil to a small pot over medium high heat. Heat the oil for about 7 minutes and allow it to cool. This “cooking” of the oil is supposed to bring out a nuttier flavor in the filling. This tip comes straight to you from Willy’s mother, a Beijing local, and an authority on dumpling-making!
Once the oil is cooled, add the ground pork to a large bowl, along with the egg……chives……sesame oil, soy sauce, and cooked, cooled oil. At this point, you should make and boil a test dumpling and try it to make sure the taste is to your liking. You can then adjust by adding more salt if needed.
Once the filling tastes right to you, begin assembling the dumplings.
When you’re ready to cook, bring a large pot of water to a rolling boil. Carefully drop the dumplings into the water and keep them moving, so they don’t stick to the bottom of the pot. Bring back to a slow boil, and cook until they float to the top and the filling is cooked through (about 5 minutes).

Monday, May 18, 2020

lo bak go - turnip cake

https://thewoksoflife.com/turnip-cake-lo-bak-go/


tried this twice.  first time I loosely followed directions and made two large pans... it turned out ok.  second time I made this I followed the recipe precisely (I even used my kitchen scale) and this turned out great! I didn't even have to fry it at the end as he last step called for because it was so good fresh.  I just let it cool for a bit an sliced and ate it


On with the recipe! You’ll need:
Grate the turnip. We just used the largest holes on a box grater.

Add grated turnip and 1 cup water to a wok or large pan and bring to a simmer. Simmer for about 10 minutes, stirring occasionally so the turnip does not brown. The turnip will produce liquid, some of which will evaporate. You will have liquid left in the pan with the radish but don’t worry about measuring it. Scoop the cooked turnip into a large mixing bowl to cool. Next, pour the remaining liquid into a measuring cup and fill the rest with water until you have 1 cup of liquid and pour it back in with the cooked turnip.

Heat your pan over medium heat and add a two tablespoons oil. Add the dried shrimp, mushrooms, and sausage and cook for about 5 minutes. Stir in the chopped scallion and remove from the heat to cool.

Add rice flour, cornstarch, salt, sugar, and white pepper to the mixing bowl with the radish and cooking liquid.

Mix well until the dry ingredients are well-incorporated.

Add in the cooked shrimp, mushrooms and sausage, and be sure to scrape the oil from the pan into the batter. Mix well and let sit for about 15 minutes.

Give the batter a final stir and pour it into a well-oiled loaf pan. Place the pan into a steamer with plenty of water and steam over medium-high heat for 50 minutes. See our post on how to set up a steamer if you’re not familiar with steaming foods in Chinese cooking.

Remove the pan from the steamer and let your turnip cake set for about 30 minutes. Once cooled, loosen the sides with a spatula and turn it out onto a cutting board. It should come out quite easily

Use a sharp knife dipped in water to slice ½-inch thick pieces. I know people who’d enjoy it just like that, but most people pan-fry them first. Add a couple tablespoons oil to a non-stick or seasoned cast iron pan over medium-low heat. Fry the cakes on both sides until golden and crispy. Serve with oyster sauce!

Tip: You can also make this turnip cake in advance, refrigerate it in the loaf pan, and slice/fry later. If you’ve refrigerated turnip cakes that you’ve already fried, the best way to reheat them is in a pan. When reheating, heat the pan over medium heat and add a tablespoon of oil. Place the cakes in the pan, immediately add a couple tablespoons of water, and cover. Remove the cover when the water has evaporated, flip, and brown the other side.
Serve with hot chili oil or oyster sauce on the side.

Saturday, May 16, 2020

Boh Loh bao - Pineapple bun


Used this recipe  https://healthynibblesandbits.com/pineapple-buns/
Easy to follow directions.  Even made some with red bean paste.  I used sweetened red bean paste, so it was a bit sweet for me, but Brian liked them.  I prefer without the filling.

I also had to substitute sugar for the sweetened condensed milk as I didn't have anything except sugar

How to Make Pineapple Buns (Bolo Bao)

Pineapple buns are classic pastries that you can find in Hong Kong style bakeries. The bun is soft and slightly sweet and it’s topped with a golden crunchy, crumbly crust. This pineapple bun recipe uses ingredients that you can find in any grocery store.
  • Author: Lisa Lin
  •  
  • Prep Time: 2 hours 30 minutes
  •  
  • Cook Time: 30 minutes
  •  
  • Total Time: 3 hours
  •  
  • Yield: 12 buns 1x
SCALE

INGREDIENTS

Tangzhong 
Dough
  • safflower or any neutral oil for greasing bowl
  • 145g (1/2 cup plus 2 tablespoons) whole milk
  • 18g (1 1/2 tablespoon) granulated sugar
  • 7g (2 1/4 teaspoons) active dry yeast
  • 490g (3 1/4 cups) bread flour 
  • 3g (1 teaspoon) kosher salt
  • 80g (4 tablespoons) sweetened condensed milk (see note 1)
  • 1 large egg
  • 55g (4 tablespoons) butter, melted
Topping
  • 55g (4 tablespoons butter), at room temperature
  • 135g (2/3 cup) superfine sugar (see note 2)
  • 1 teaspoon vanilla extract
  • egg yolk
  • 1 tablespoon whole milk
  • 120g (3/4 cup) all-purpose flour
  • 1/4 teaspoon baking powder
  • 1/8 teaspoon turmeric
Egg Wash 
  • 1 large egg
  • 1 tablespoon whole milk
Equipment
  • large-sized mixing bowl
  • stand mixer
  • 2 baking sheets
  • parchment paper

INSTRUCTIONS

Make the Tangzhong
  1. Whisk the flour and water inside a saucepan until the flour dissolves. (See note 3 for microwave directions.)
  2. Place the saucepan over medium heat and stir the mixture frequently. In about a minute, the flour will start to thicken. Don’t walk away during this process as you can quickly burn the tangzhong! Once the flour develops into a light paste, turn off the heat.
  3. Transfer the tangzhong to a bowl to cool. It will thicken as it cools.
Prepare the Dough for Buns
  1. Grease a large mixing bowl with oil. Set it aside. 
  2. In a microwave-safe bowl, heat the milk for about 40 to 45 seconds. Add the sugar to the milk. Use a thermometer to check the temperature of the milk. It should be around 110ºF to 120ºF. It’s okay if you are just several degrees off. 
  3. Add the yeast and stir to hydrate the yeast. Let it sit for 5 to 8 minutes while you prepare the other ingredients. After 5 to 8 minutes, the milk/yeast mixture will foam up.
  4. In the bowl of a stand mixer, combine the bread flour, salt, condensed milk, egg, melted butter, tangzhong and the foamy milk/yeast mixture. 
  5. Fit the mixer with the dough hook. Mix the dough on low for 10 minutes (see note 4). If the dough completely spins away from the dough hook after a few minutes, turn off the mixer. Readjust the dough right into the center of the bowl and position the dough hook in the center of the dough. Run the mixer on “stir” for 15 seconds or so before you increase the speed to low.
  6. After 10 minutes, scrape the dough out of the bowl onto a surface and knead it several times. The dough shouldn’t be sticky, so you do not need to flour the surface.
  7. Shape the dough into a ball and place inside the greased mixing bowl. Cover the bowl with plastic or silicone mat. Let the dough rise in a warm area for about 1 hour to 1 hour 30 minutes, until the dough doubles in size. 
Prepare the Dough for Topping
  1. Add the butter to the bowl of a stand mixer. Fit the mixer with the flat beater attachment. Cream the butter on medium-low until it is light and fluffy, about 1 to 2 minutes. Add the superfine sugar in two batches. The mixture will look very crumbly at this point, and that’s okay.
  2. Next, add the egg yolk, milk, and vanilla, and mix on low until just combined. 
  3. In a small bowl, mix the flour, baking powder, and turmeric. Add half of the flour to the bowl with the wet ingredients, and mix on low until the flour is combined. Then, add the remaining flour and mix again. Once all the loose flour has been incorporated, increase the speed to medium-low, and keep mixing until the dough starts to come together into large chunks. 
  4. Scrape the dough out of the bowl onto a surface. Gather it up into one large ball of dough. Transfer this to another bowl and cover it with a towel or silicone mat until the buns are done proofing.
Shape the Buns (Use Photos in Blog Post for Reference)
  1. Line 2 large baking sheets with parchment paper.
  2. Once doubled, punch down the dough to release excess air. Turn the dough onto a work surface. Divide the dough into 2 equal portions (450 to 456 grams each). Place 1 portion of dough back into the bowl, cover it, and refrigerate while you shape the first batch of buns.
  3. Next, divide the remaining dough into 6 equal pieces (74 to 76 grams each). Take one of the pieces of dough and knead it several times to get rid of any air bubbles. Then, shape this dough into a ball and transfer it to the lined baking sheet, seam side down. The dough should be about 2 inches in diameter. Repeat with the remaining 5 pieces of dough.
  4. Cover the balls of dough with a towel and let them rise in a warm place for 30 to 45 minutes, until they increase to 1.5 times its size (about 3 inches in diameter). 
  5. Preheat the oven to 375ºF. If you want more golden looking pineapple buns, preheat the oven to 385ºF. Position an oven rack to the center position.
Add the Topping and Bake (Use Photos in Blog Post for Reference)
  1. While the buns are proofing, divide the dough for the topping into 12 pieces (about 27 to 29 grams each). Roll each piece into a ball.
  2. Take a plastic storage bag, and cut off the zipper. Continue cutting the bag along the edges so that you have 2 large sheets of plastic. You’ll be rolling the topping in between these plastic sheets.
  3. In a small bowl, prepare the egg wash by whisking an egg yolk with 1 tablespoon of milk.
  4. After the buns are done proofing, start rolling out the topping. 
  5. Take a ball of the topping dough and place it on the center of a plastic sheet. Lightly flatten the dough out with the palm of your hand. Then, cover the flattened disc with the other sheet of plastic. Roll out the dough until you get a circle that is 3.5 to 3.75 inches wide. 
  6. Peel off the top sheet of plastic, turn the topping onto your hand and carefully peel off the other sheet of plastic. 
  7. Drape the topping over one of the buns. The topping shouldn’t cover the bun completely. The topping can burn if it touches the bottom of the baking sheet. Continue rolling out the topping and draping it over the buns.
  8. Brush the tops of the buns with egg wash. 
  9. Bake the buns for 14 to 16 minutes, until the tops are lightly golden. 
  10. Once the first batch of buns is in the oven, prepare the second batch of buns and bake. 
  11. Let the buns cool on the baking sheet for several minutes before transferring them to a cooling rack.
  12. Enjoy the buns while they’re still warm! That’s when they are the tastiest.

NOTES

  1. Sweetened Condensed Milk: I use it to give the dough a sweet, milky flavor. You can substitute it with 2 tablespoons instant milk powder and 3 tablespoons of sugar. If you don’t have either sweetened condensed milk or milk powder, just use 3 tablespoons of sugar instead.
  2. Superfine Sugar is merely more finely ground granulated sugar. I am using it for this recipe because it dissolves easier and it gives the topping a nice crunch. Some brands label this as “ultrafine sugar.” If you can’t find any, you can blend regular granulated sugar in a food processor until the sugar is more finely ground. While you can use powdered sugar, the topping won’t be as crunchy. Furthermore, the powdered sugar topping goes completely soft the next day, whereas the superfine sugar topping retains a lot of its crunch.
  3. Place the bowl into the microwave, and heat the flour and water mixture for 20 seconds on high. Take the bowl out of the microwave, stir everything and check the consistency of the mixture. Continue heating the mixture at 5 to 6 second intervals, stirring in between, until you get a thick paste. 
  4. Because of the large amount of dough in the bowl, the mixer will shake pretty violently if you try to mix the dough at a higher speed. For the sake of preserving the longevity of my stand mixer, I opted to mix the dough at a lower speed.

Nutrition

  • Serving Size: 1 bun
  • Calories: 355
  • Sugar: 17.3g
  • Sodium: 152.8mg
  • Fat: 10.7g
  • Saturated Fat: 5.9g
  • Carbohydrates: 55.7g
  • Fiber: 1.4g
  • Protein: 8.6g
  • Cholesterol: 70.4mg

Sunday, May 10, 2020

siu yuk (roast pork)


only marinated for 24 hrs, still tasted yummy. broiled at the end.  may cook more than 1 hour next time

Recipe loosely based on the one below.  But just sprinkled seasoning on like in this video

Also par boiled it, skin side down for about 90 seconds, so I could poke holes in the skin


From Facebook


Calvin Tam Luong shared his first post.
New Member5d · tagrecipe
My name's Calvin but my Cantonese name is "Ah Wing" as of lately people only refer to me is "Ju Yuk Wing" or "Siu Yuk Wing" 😂🤣
When the whole family and friends only want one thing from you....😐
plenty of steps to make this but easy once you get it down😉
2.5-3lbs of pork belly
teaspoon salt
teaspoon sugar
1/4 teaspoon 5 spice powder
1/6 teaspoon white pepper
combine all season set aside
skin side up, poke holes only skin deep throughout with a small sharp knife or prickler of some sort.
teaspoon shaoxing cooking wine rub meat part, season meat side throughout without touching skin
flip over, wipe skin dry and clean off any seasoning touching with dry paper towel. brush a little white vinegar on skin then sprinkle generous amount of salt of any kind on skin then place in fridge skin up on a tray or plate for 2 days( the salt help pulls water out of skin faster. reason to do this is because when you roast the pork belly skin stays attached to meat without falling off when cutting.
2 days later wrap in aluminum foil with skin exposed facing up. place in elevated metal rack inside a dripping tray, pour about 3 cups water in that tray( helps prevent pork skin from burning while roasting).
roast time exactly 1 hour @ 450 degree Fahrenheit.
let cool 30 minutes before cutting ^___^

chicken rice


Hainanese Chicken Rice, by thewoksoflife.com
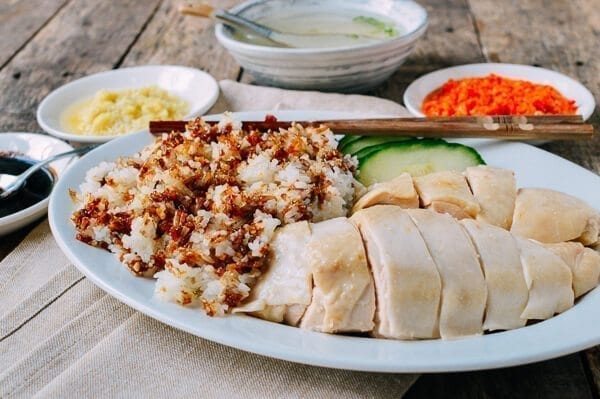
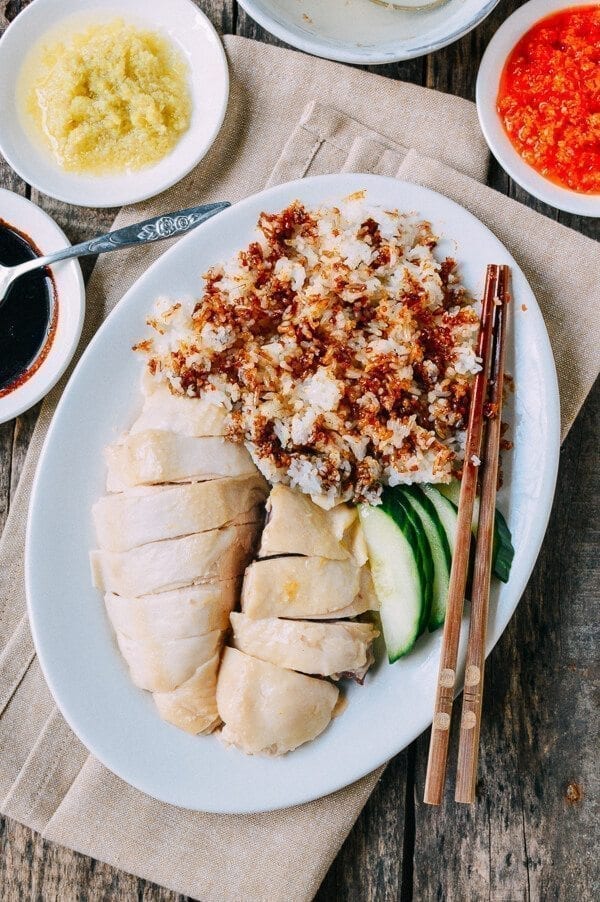
Hainanese Chicken Rice (海南鸡) originated––perhaps unsurprisingly––in Hainan, China, a tropical island located at the southern tip of the country. In recent years, it has become one of the top tourist destinations in China, probably due at least in part to the abundance of delicious plates of Hainanese chicken rice.
–– ADVERTISEMENT ––
Hainanese chicken rice has become a famous dish (thanks, Anthony Bourdain!), but it’s especially popular in South East Asian countries like Singapore, Malaysia and Thailand. There are large populations of Chinese in these countries, and this dish crossed borders along with Chinese migrant workers.
While the chicken is undoubtedly a key component of the dish, I personally think the main event is the rice, which is cooked with chicken fat and chicken stock (from poaching the whole chicken). Normally, rice is cooked with plain water, so I can only imagine the reactions when people first taste this rice: eyes-popping and jaws dropping (to shovel in more of that rice, of course). It’s a luxury to cook rice using chicken soup, and the taste is better than plain white rice by a mile and a half.
As if the rice weren’t enough, the Hainan chicken is perfectly cooked, emerging from the stock pot (and then an ice bath) perfectly moist and silky. And on top of all that, you get to douse the whole thing in as much sauce as you want. In this case, there are three sauces: a chili sauce, a ginger sauce, and a sweet dark black soy sauce. This Hainanese chicken rice recipe takes some concentration and a little elbow grease, but the results are well worth the effort!
Hainanese Chicken Rice, by thewoksoflife.com

For the Hainan chicken:
  • 1 whole fresh (or organic) chicken, 3-3½ pounds
  • 1 tablespoon salt
  • 12-14 cups water
  • 4-5 slices ginger
  • 2 whole scallions
  • Ice
Wash the chicken clean and remember to set aside the piece of chicken fat at the back cavity. Transfer the chicken to a plate and pat dry with a paper towel. Lightly rub the chicken with the salt. This will give the chicken skin a nice sheen. Set it aside.
Bring the water, along with the ginger and scallions, to a boil in a large stockpot. Before adding the chicken to the pot, rinse the chicken under running water to wash away the salt. Carefully lower the chicken into the boiling water, positioning the chicken breast-side up. Now is a good time to adjust the water level so the chicken breast just pokes above the water (so you aren’t left with dry white meat).
Once the water boils, carefully lift the chicken out of the water to pour out the colder water that is trapped in the cavity. Carefully lower the chicken back into the pot. Bring the water to boil again, and cover the lid. Turn off the heat, and leave the pot, covered, on the stove for 45-50 minutes (set a timer). To check if the chicken is done, stick a toothpick into the thickest part of the drumstick; if the juices run clear, it’s cooked through. The chicken in this Hainanese chicken rice recipe is very similar, if not identical, to how you cook Cantonese poached chicken.
Hainanese Chicken Rice, by thewoksoflife.com

When the 45-minute timer (for the chicken) is almost up, prepare a large ice bath. Once the chicken is cooked, carefully lift the chicken out of the pot, drain the water from the cavity and lower it into the ice bath. Take care not to break the skin. After 15 minutes in the ice bath, the chicken should be cooled, drain completely and cover with clear plastic until ready to cut and serve. The ice bath stops the cooking process, locks in the juices, and gives the chicken skin better texture.
Hainanese Chicken Rice, by thewoksoflife.com
Trust us.
To cook the rice:
  • Chicken fat, taken from the back cavity of the chicken
  • 4 cloves of garlic, minced
  • 3 cups of white rice, preferably jasmine rice, washed and drained
  • Chicken stock, from cooking the chicken
  • 2 teaspoons salt
While the chicken is cooling, make the rice. Heat a wok over medium heat. Add the chicken fat and render for about a minute. Stir in the minced garlic and fry briefly, making sure it doesn’t burn.
Hainanese Chicken Rice, by thewoksoflife.comAdd the uncooked rice. Stir continuously for about two minutes
Turn off the heat. Scoop the rice into your rice cooker and add the appropriate amount of chicken stock (instead of the usual water. This amount may vary depending on your rice cooker) and salt. Close the lid and press START.

If you don’t have a rice cooker, you can follow these steps. When you wash your rice, let it soak for an additional 20 minutes. Then drain the rice and follow the same steps above, but instead of transferring the rice mixture to your rice cooker, transfer it to a medium/large pot. Add 3 cups of chicken stock and the salt, giving it a quick stir. Cover the pot and bring to a boil. Once it boils, immediately turn down the heat to the lowest setting. Let the rice simmer and cook (covered) for 10-15 minutes until the rice is done. It’s not quite as foolproof as the rice cooker, but you should get a very similar result. Just be sure to keep an eye on it; burnt rice is no fun.
While the rice is cooking, let’s prepare the three signature dipping sauces. You can also start preparing these sauces while the poached chicken is cooking in the pot.

Wednesday, May 6, 2020

steamed pork ribs with black bean sauce

Steamed pork ribs with black bean sauce


the photo is with rice. As you can see,  it's a bit darker than the video because I also crushed the black beans.  Very yummy and tender though


Note: I only rinsed for a few minutes and not the 11 minutes called for.  I also just eyeballed the black beans.  The meat however was very tender and the taste was spot on.


https://www.youtube.com/watch?v=ReIyBD3Ir88

https://www.reddit.com/r/Cooking/comments/8hw139/recipe_dim_sum_spareribs_%E8%B1%89%E6%B1%81%E8%92%B8%E6%8E%92%E9%AA%A8/
Ingredients:
One of the rare recipes we toss out where the vast majority of these ingredients can be sourced from a Western supermarket. The taro can be subbed with pumkin, and the one Chinese-food specific ingredient (douchi, black fermented soybeans) is really quite available online. And in a pinch, those fermented soybeans could even be skipped – the taste wouldn’t be the same but the dish’d still come out great.
  1. St. Louis-style Spareribs (腩骨), 500g: Cleaved across the bone into 1.5-2cm pieces. This cut that we’re using is from the very bottom of the ribs – it’s basically the same as ‘St. Louis-style Spareribs’. You can also obviously just get a rack of spareribs and trim em yourself too.
  2. Taro (芋头), ~500g. Cut into either 1.5-2 cm cubes or ‘diamonds’. The variety of Taro that we used is ‘Dasheen’, but either variety of taro should work great here. Because Taro takes longer to cook than ribs, we’ll be pre-frying this… if ya wanna skip that extra step feel free to use pumkin in its place.
  3. Baking Soda (小苏打). Baked for one hour at 150 centigrade. We learned this technique from a ramen video by ‘Alex the French Guy Cooking’ (great channel by the way), and it makes a spot on sub for alkaline water. By baking the baking soda, you’re turning it into sodium carbonate – a stronger base with a pH of about 10.5-10.75. In the video, we baked 200g of baking soda total and jarred up the rest (we’ll definitely be using this stuff again). If you can source proper alkaline water, you obviously won't need the baking soda!
  4. One liter of water mixed with one teaspoon of the baked baking soda -or- 10g of alkaline water if you can source it. To soak the ribs. The reason we can’t just use a higher concentration of baking soda is that pH is a logarithmic scale. Something with a pH of 11 isn’t just ~20% more basic than something with a pH of 9… it’s exponentially more basic. Full disclosure that I’m no chemist, but I’m pretty sure that our baked baking soda is somewhere between 31-56 times more basic than baking soda. Regardless… even if my understanding’s slightly off somewhere, we can confidently say that in our tests the baked baking soda gave a much better result in the end.
  5. Marinade for the ribs: 1 large clove garlic minced, 1 tsp salt, ½ tbsp chicken boullion powder (鸡粉), 2 tbsp sugar, ½ tsp white pepper powder (白胡椒粉). This marinade’s more for flavor than texture – more on that in the notes below.
  6. Douchi, Black Fermented Soybeans (豆豉), 10g. In the interest of convenience we’ll just be mixing this together with the ribs when marinating. Besides this ingredient, I know basically everything else in this recipe can be sourced in a well stocked Western supermarket… these guys’re available on Amazon if ya don’t have access to an Asian grocer.
  7. Coating for the ribs: 4 tbsp cornstarch (生粉), 1 tbsp peanut oil (花生油), ½ tbsp toasted sesame oil (麻油). So the cornstarch coating’ll give the ribs a nice soft texture, while also helping to absorb any excess moisture released while steaming. The oils help give the ribs some sheen. We use dry cornstarch so we don’t introduce too much moisture to the mix (some people use a slurry), so ya might need to add a small drizzle of water too if it’s clumping up on ya.
  8. Optional garnish: a few slices of red and green mild chilis. You could also use a little julienned red and green bell pepper, or just skip it. As an aside, uh… don’t do what we did in the video and garnish before steaming – the green chili comes out pretty unattractive looking. We’ll talk about this more in the process below.
Process:
So right, the basic idea here is to prep the ribs by mimicking that washing machine. We’ll soak those ribs in the alkaline mixture, then we’ll rinse em under running water while stirring, and finally thoroughly spin em dry in a salad spinner. Once we do that, we can just marinate, coat, and steam.
  1. Bake the baking soda at 150C for one hour. Now, no matter how much baking soda ya bake, you’ll definitely still get some excess – jar it up in an airtight container. Also, use gloves to handle the baking soda after baking… it’s not so basic that it’ll hurt you, but it could definitely cause skin irritation of you touch it.
  2. Cut the ribs and the taro into 1.5-2 cm pieces. If ya don’t own a cleaver, you’ll prolly need to get the ribs from a butcher or an Asian grocer. For the taro, a bit more traditional is to cut it into a sort of ‘diamond’ shape (cut into strips and then on a bias), but either that or cubes are both ok.
  3. Toss the cut ribs into a large bowl with one liter of water and one teaspoon of baked baking soda. Soak for 30 minutes. Stir it gently to make sure everything’s mixed. The basic liquid’ll both tenderize the ribs a bit while also helping to draw out the myoglobin from the ribs. After a half an hour, that water should really appear quite red if stirred.
  4. Drain the water, put the bowl under running water, and stir for 12-15 minutes. In the interest of obsessiveness, we’re actually copying the ‘wash cycle’ here. Stir for a bit in one direction, then stir backwards. After 12-15 minutes, the ribs should look much paler and the water should run relatively clear.
  5. Put in a salad spinner and spin for ~2 minutes. To mimic the dry cycle of course lol. The salad spinner’ll not only dry these guys, but the motion’ll help remove some of the remaining myoglobin. After about a minute of spinning, check the water – it should be a relatively pale pink. If it’s a darker red, give that one more rinse under running water for a minute and repeat. After two minutes of spinning, it should be dry enough to marinate.
  6. Mix in the marinade, then toss in the douchi black fermented soybeans and combine well. Marinate for at least a half an hour and up to overnight. So that soak in the alkaline water did all the work we needed re texture, this marinade’s mostly for flavor. Because of that, there’s not much of an upper limit in marinade time – a half hour should be fine (for reference, in the video we let it go for about an hour), but overnight is also great. Whatever makes sense for your mise.
  7. Fry the taro. If using pumpkin, you can skip this step. Restaurants deep fry the taro at a high temperature (i.e. 200C+) for about two minutes to prep it, but we opted for panfrying because I know we’re already being a bit annoying with all that rib prep. So add ~5 tbsp of oil to a wok (or cast iron or nonstick) and pan fry those cubes, tossing occasionally, for ~6 minutes. Then, up the heat to high and stir-fry for about a minute.
  8. Coat the now-marinated ribs. Mix in that four tablespoons of cornstarch in with the ribs. Really to a bang up job mixing it, and word of warning that there’s a good chance it’ll clump on ya (whether it clumps or not’ll basically depend on how well you dried the ribs in step #5). If it does, add in a drizzle of water… really, no more than a half a tablespoon because we don’t want this to be too wet. Then add in the peanut and toasted sesame oils, and coat well.
  9. Assemble the steaming trays. This recipe makes enough for six small bowls of ribs in total (really, opt for small bowls if at all possible) – should be enough to fit into two large bamboo steamers. Place a layer of taro at the bottom, then layer the ribs on top. For a touch of extra sheen, drizzle a tiny bit of extra peanut oil on top for good measure.
  10. Steam for 15 minutes. The water should be at a hefty boil.
  11. If garnishing… uncover, place a couple mild chilis/peppers on top, turn the heat down to low and lightly simmer for at least one minute or until you’re ready to eat. Dim Sum restaurants garnish in between the primary steam and placing it on the those steaming trays. Also, if you’re making other dishes to go with this, feel free to just let that keep lightly simmering/steaming at a low temp til you’re ready to serve.
Note on using a steaming rack:
So you can use a steaming tray with this too, but it might just be a touch of a headache to nestle in. Put some small bowls onto the steaming rack, and plate a saucer on top of the small bowl to seal it. It’s important to cover the bowls if using this method, as the steam can condense on your lid and drip down onto your dish.
Note on marinades:
So formally, there’s two separate things that we translate as ‘marinades’ in these recipes: shangjiang (上浆) and mawei (码味).
Shangjiang is a marinade that is used for texture – it most commonly uses cornstarch, but you can also see egg whites, baking soda, papain… etc. While we usually just refer to this as marinating, I’m 90% sure that the term ‘velveting’ is an English translation for shangjiang. (I haven’t really been able to find much on the etymology of velveting, unfortunately)
Mawei is a marinade that’s used for taste. An example would be to marinate fish pieces with ginger and liaojiu (Shaoxing wine) to remove the fishiness, or to marinate organ meat with white pepper and liaojiu to remove the gaminess. We used a mawei in this recipe.
In informal language, usually Chinese recipes simply use one verb (腌制) to refer to both. So I feel it’s less confusing to not differentiate em in English, cuz the word ‘marinate’ is similarly colloquial.